4. just to test, some random database hosted by the MySQL server.
mysql> create user sqlserver identified by '-Aye3reF'
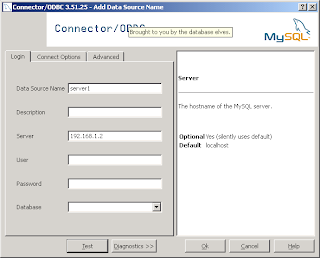
3. Now we need to set up the SQL server. Once we've installed the MySQL ODBC drivers on the SQL server, we can proceed with setting up a system DSN.
From the 'System DSN' tab in the ODBC data connection manager, click 'Add' then select 'MySQL ODBC x.xx Driver'
Click 'Finish'

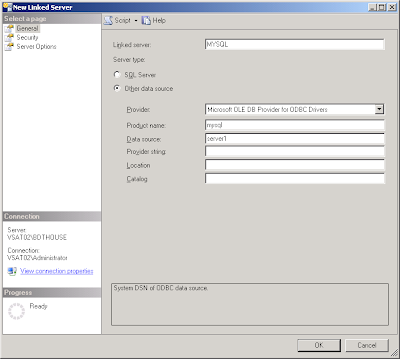
4. Now we have to start SQL Server management studio (SMSS) and create the linked server from SMSS, expand 'Server Objects', then right-click 'Linked Servers' then click 'New Linked Server...'
From the 'new Linked Server' dialog, give your new linked server a name, select 'Microsoft OLE DB Provider for ODBC drivers' for provider and for data source, fill in MySQL for the 'product name' then finalle enter the name of the ODBC DSN you created in step 3 for 'Data source'.

Now, if we didn't specify the username and password in the ODBC configuration, we need to set that up on the SQL server.
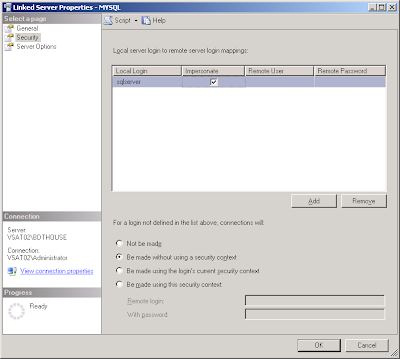
5. Once you're done with that, select the 'security' page on the left.
Note: you only need to complete this step if you didn't specify a username and password in the ODBC DSN configuration.
We can set up security in 2 ways:
i) create a SQL server login with the same username and password as the MySQL account created previously and enable the impersination option.
ii) create a SQL server login account and map that account to the MySQL account created.
Configuring a SQL account to impersonate a remote MySQL account in the linked server security settings:
For the first options, we need to make sure we have a user account created with the same username and password as the remote MySQL user.
we can achieve this by running the following script against the SQL server instance we plan to use the linked server on:
use master
go
create login sqlserver with password='-Aye3reF'
go
CREATE USER sqlserver FOR LOGIN sqlserver
go
grant execute on sys.xp_prop_oledb_provider to sqlserver
go
Note: the username and password you specify above on the 'create login' line needs to match the username and password created in the MySQL installation.
then! for the security page of the linked server properties, you can click 'add' under 'local server to remote server login mapping'. Pick the user account you just created, then check the 'impersonate' check box.
then we can hit 'OK'
For the second method of setting up the login mappings, we can just create a regular SQL user account (the username and password won't matter), set it up so that account is mapped to the MySQL login we created above in step 2.
use master
go
create login randomuser with password='randompassword'
go
create user randomuser for login randomuser
go
grant execute on sys.xp_prop_oledb_provider to randomuser
go
then, from the security page of the linked server properties, click 'new', then select this user account you've just created. This time you also need to fill in the 'remote user' and 'remote password' columns. Under 'remote user' enter the username for the user account you've created in MySQL, and under 'remote password' enter the MySQL password for that user account.

Click OK.
Once you've done this, you should be able to log in as the SQL user you've created and execute statements against the linked server.
to test, you can log into SMSS as the user you just created, expand 'server objects' then 'linked servers' then the linked server we just created for the mysql database should be visible like so, and if you've set up the databases and permissions like I did in this example, the query:
select * from openquery( MYSQL, 'select * from world.country')
should work fine as well.


1 comment:
reviewing some years later: gaddam what a cheesy post... *shakes head*
Post a Comment