Monday, March 15, 2010
Study:Money
Tuesday, February 16, 2010
idea!!
Saturday, February 6, 2010
c++ to java
you know, every time I tell someone that I'm converting a c++ application into java, I usually get lectured about java being invented to solve all of the shortcomings of c++, yet i still find great difficulty in expressing certain c++ concepts in java. For example, I can't make an unsigned int in java, and when i see code like this:
typedef unsigned int a
typedef unsigned char c;
unsigned char *B;
B=(c*)calloc(a, 1);
I practically soil myself. not only do i not have unsigned ints in java, so in order to match the max value i have to use a long. So instead of a 32-bit variable, i'm using a 64-bit variable. The code above presents another problem; i can't exactly give a java array a long index.
Not kool! Just thought I'd vent about that for a bit. If anyone has any ideas about how to convert this to java, let me know!
Saturday, September 19, 2009
....salty ):
SHA-1(uppercase(username)+password)
then that makes for a stronger hash, but then an attacker might know this and will adjust his attacks to include passwords prefixed with some other field (if it's that important to him)
i spose what we can do is store passwords like this:
un=uppercase(username)
split un into x parts, depending on length : u1,u2...ux
plit password into x parts: p1,p2....px
then we can store passwords like this:
SHA-1(u1,px,u2,px-1.....p1,ux)
or something slick like that, i dunno. the kool thing is that if the attacker evenfinds the reverse of the hash, and knows the username and tries to remove it from the string, the password is still mixed up!
Saturday, June 27, 2009
adventure!
i've created
a text file!
Next, I saved this as file.txt, then went to the command line, typed in 'debug file.txt' and did this:
-d
1794:0100 69 27 76 65 20 63 72 65-61 74 65 64 0D 0A 20 61 i've created.. a
1794:0110 20 74 65 78 74 20 66 69-6C 65 21 0D 0A 00 83 17 text file!.....
1794:0120 00 00 00 00 00 00 00 00-00 00 00 00 00 00 00 00 ................
1794:0130 00 00 00 00 00 00 00 00-00 00 00 00 00 00 00 00 ................
1794:0140 00 00 00 00 00 00 00 00-00 00 00 00 00 00 00 00 ................
1794:0150 00 00 00 00 00 00 00 00-00 00 00 00 00 00 00 00 ................
1794:0160 00 00 00 00 00 00 00 00-00 00 00 00 00 00 00 00 ................
1794:0170 00 00 00 00 00 00 00 00-00 00 00 00 00 00 00 00 ................
-e110
1794:0110 20.00 74.83 65.17
-rcx
CX 001D
:010
-rcx
CX 0010
:
-w
Writing 00010 bytes
-q
Then when I open file with notepad, the contents are:
i've created
a
so then:
I delete all the contents of file.txt, the size reads as 0 KB
Then:
-d
1794:0100 69 27 76 65 20 63 72 65-61 74 65 64 0D 0A 20 61 i've created.. a
1794:0110 00 83 17 78 74 20 66 69-6C 65 21 0D 34 00 83 17 ...xt file!.4...
1794:0120 00 00 00 00 00 00 00 00-00 00 00 00 00 00 00 00 ................
1794:0130 00 00 00 00 00 00 00 00-00 00 00 00 00 00 00 00 ................
1794:0140 00 00 00 00 00 00 00 00-00 00 00 00 00 00 00 00 ................
1794:0150 00 00 00 00 00 00 00 00-00 00 00 00 00 00 00 00 ................
1794:0160 00 00 00 00 00 00 00 00-00 00 00 00 00 00 00 00 ................
1794:0170 00 00 00 00 00 00 00 00-00 00 00 00 00 00 00 00 ................
0_o ….. hey all that data is still there, and where did that 4 come from?
-rcx
CX 0000
:
So then I do this:
-rcx
CX 0000
:01f
-w
Writing 0001f bytes
-
Then when I open the file in notepad, I get this:
i've created
a ƒxt file!
4 ƒ
so then I tried:
-rcx
CX 001F
:11
-w
Writing 00011 bytes
Which gave me this:
i've created
a
to be continued!…..
Friday, May 30, 2008
Creating a linked MySQL server from SQL server 2005
4. just to test, some random database hosted by the MySQL server.
mysql> create user sqlserver identified by '-Aye3reF'
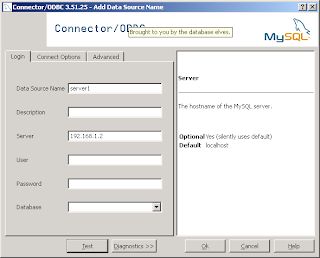
3. Now we need to set up the SQL server. Once we've installed the MySQL ODBC drivers on the SQL server, we can proceed with setting up a system DSN.
From the 'System DSN' tab in the ODBC data connection manager, click 'Add' then select 'MySQL ODBC x.xx Driver'
Click 'Finish'
4. Now we have to start SQL Server management studio (SMSS) and create the linked server from SMSS, expand 'Server Objects', then right-click 'Linked Servers' then click 'New Linked Server...'
From the 'new Linked Server' dialog, give your new linked server a name, select 'Microsoft OLE DB Provider for ODBC drivers' for provider and for data source, fill in MySQL for the 'product name' then finalle enter the name of the ODBC DSN you created in step 3 for 'Data source'.
Now, if we didn't specify the username and password in the ODBC configuration, we need to set that up on the SQL server.
5. Once you're done with that, select the 'security' page on the left.
Note: you only need to complete this step if you didn't specify a username and password in the ODBC DSN configuration.
We can set up security in 2 ways:
i) create a SQL server login with the same username and password as the MySQL account created previously and enable the impersination option.
ii) create a SQL server login account and map that account to the MySQL account created.
Configuring a SQL account to impersonate a remote MySQL account in the linked server security settings:
For the first options, we need to make sure we have a user account created with the same username and password as the remote MySQL user.
we can achieve this by running the following script against the SQL server instance we plan to use the linked server on:
use master
go
create login sqlserver with password='-Aye3reF'
go
CREATE USER sqlserver FOR LOGIN sqlserver
go
grant execute on sys.xp_prop_oledb_provider to sqlserver
go
Note: the username and password you specify above on the 'create login' line needs to match the username and password created in the MySQL installation.
then! for the security page of the linked server properties, you can click 'add' under 'local server to remote server login mapping'. Pick the user account you just created, then check the 'impersonate' check box.
then we can hit 'OK'
For the second method of setting up the login mappings, we can just create a regular SQL user account (the username and password won't matter), set it up so that account is mapped to the MySQL login we created above in step 2.
use master
go
create login randomuser with password='randompassword'
go
create user randomuser for login randomuser
go
grant execute on sys.xp_prop_oledb_provider to randomuser
go
then, from the security page of the linked server properties, click 'new', then select this user account you've just created. This time you also need to fill in the 'remote user' and 'remote password' columns. Under 'remote user' enter the username for the user account you've created in MySQL, and under 'remote password' enter the MySQL password for that user account.
Click OK.
Once you've done this, you should be able to log in as the SQL user you've created and execute statements against the linked server.
to test, you can log into SMSS as the user you just created, expand 'server objects' then 'linked servers' then the linked server we just created for the mysql database should be visible like so, and if you've set up the databases and permissions like I did in this example, the query:
select * from openquery( MYSQL, 'select * from world.country')
should work fine as well.